Good To Know: Mixing Metals

THE ART OF MIXING METALS
Creating homes that have timeless character is our thing. I strongly dislike wasting money, resources, and time. So, when we create spaces that are too trendy and go out of style, we end up wasting all of the above. Which brings me to what I want to talk about today: mixing metal finishes to create a timeless interior with character. There is an art to mixing metal finishes in a balanced way. We are here to help you as best we can in this blog post. As with all things— trust yourself. You are the owner of your space and the most important thing is that the things you choose speak to you!
FIRST TO CONSIDER
BUDGET
The budget is important to understand because, for example, it will be more of a stretch to afford a brass faucet in comparison to a chrome faucet if you have a tighter budget. You can find a brass light fixture or cabinet knobs for the same price as other finishes. So, if you want to incorporate expensive finishes such as brass or polished nickel, save those for the light fixtures, mirror, or cabinet hardware.

RULE OF THREE
Our one and only rule when mixing metals is no more than 3 metal finishes in a line of sight. If you are in your entry and you can see into the room on the left and the room on the right, make sure all of the light fixtures in the entry and front rooms all coordinate with each-other.


The PROCESS OF PICKING METAL FINISHES
STEP 1
Pick your Favorite
When building a design for a room in your home, start with your favorite fixture, whether it be the faucet, light fixture, or even the cabinet hardware. Start with the thing that “sparks joy” for you and then go from there.
STEP 2
Match and Balance
Next, pick something else in the room with the same metal finish. In the bathroom, whatever finish you pick for your faucet should match the shower fixture and possibly the mirror frame as well. In the kitchen, we would usually pick a different finish on the faucet than we would choose for the cabinet hardware, and then we would incorporate one of the two finishes into the light fixture.
STEP 3
Incorporate Another Metal Finish
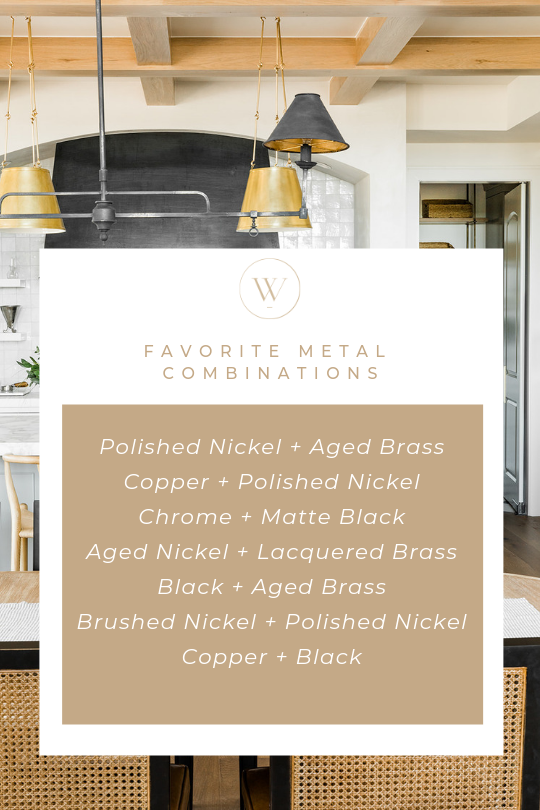
Pick another finish that compliments the metal finish you have already chosen. I will include a guide for metal combinations that we like the best. Also, consider the finish on the metal along with the metal itself. For instance, an aged brass has a brushed finish and polished nickel is obviously polished. Make sure the finishes work well together as well as the metals themselves.
STEP 4
Add the Finishing Touch
This could be one last accent metal finish, or even better, you could incorporate a texture such as: a wood framed mirror, a linen shade, a woven rattan light, a bone or marble cabinet hardware pull, a plaster light fixture, or glass.
There you have it! Now you have created an interesting, layered, and timeless space that will get better with age, unlike that spoiled container of yogurt that lives in the back of your refrigerator.